Buenas,
Personalización del SplashScreen del IDE / Customizing the IDE SplashScreen
Post in two languages / Mensaje en dos idiomas:
 En este artículo quiero explicar cómo personalizar el SplashScreen del IDE de RadStudio, es decir, cómo poner un icono y un mensaje personalizado en la pantalla de inicio del IDE. Esto es útil más que nada para los creadores de componentes o expertos para Delphi y válido desde la versión 2005.
Hacerlo es realmente sencillo. Para ello tenemos que seguir los siguientes pasos:
- Escogemos una imagen en formato bmp y de tamaño 24×24 que queramos poner. El píxel inferior izquierdo se tomará como el color de transparencia.
- La añadimos a un archivo de recursos. Si no sabemos cómo, podéis mirar la entrada anterior de este mismo blog.
- Una vez echo ésto, sólo tendremos que usar la variable global SplashScreenServices y su método AddPluginBitmap en, por ejemplo, el procedimiento Register.
SplashScreenServices es de tipo IOTASplashScreenServices (Interface Open Tools API SplashScreen Services) definidos los dos (variable y interface) en la unit ToolsAPI, por lo que deberemos añadirla a la cláusula uses. Para no tener errores de compilación tendremos que incluir en el requires del proyecto la bpl designide (designide.dcp).
AddPluginBitmap recibe una serie de parámetros:
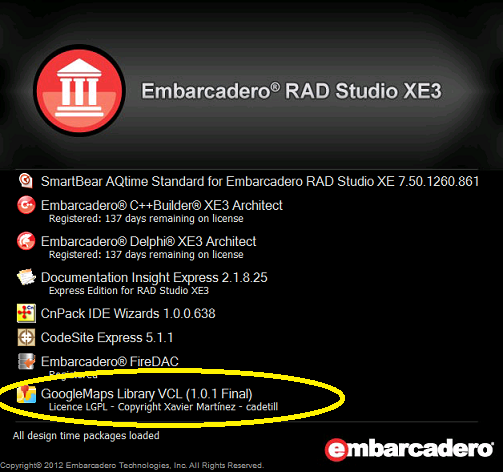
- ACaption: texto que aparecerá en el splashscreen. En el ejemplo «GoogleMaps Library VCL (1.0.1 Final)».
- ABitmap: handle de la imagen a mostrar.
- AIsUnRegistered: especifica si está o no registrado. En caso de no estarlo (True) se pintará en rojo.
- ALicenseStatus: texto a mostrar después de ACaption. En el ejemplo «Licence LGPL – Copyright Xavier Martínez – cadetill».
- ASKUName: texto que se añadirá al caption.
Con estos sencillos pasos ya tenemos el SplashScreen del IDE personalizado con nuestros componentes o expertos.
Un ejemplo de procedimiento Register podría ser este:
procedure Register;
{$IFDEF DELPHI2005}
var
  Bmp: HBITMAP;
{$ENDIF}
begin
  // registrar componentes y editores
  RegisterPropertyEditor(TypeInfo(TAboutFrm), nil, '', TAboutGMLib);
  RegisterComponentEditor(TGMBase, TGMBaseEditor);
  RegisterComponentEditor(TGMLinkedComponent, TGMLinkedComponentEditor);

  {$IFDEF DELPHI2005}
  ForceDemandLoadState(dlDisable);
  if Assigned(SplashScreenServices) then
  begin
    Bmp := LoadBitmap(FindResourceHInstance(HInstance), 'TGMMap');
    try
      SplashScreenServices.AddPluginBitmap('GoogleMaps Library 1.0.1 Final', Bmp, False, 'Licence LGPL');
    finally
      DeleteObject(Bmp);
    end;
  end;
  {$ENDIF}
end;
Espero que os sea de utilidad.
 Customizing the IDE SplashScreen
In this article I would to explain how customizing the IDE SplashScreen from RadStudio, ie how to put an icon and a personalized message on start up IDE screen. This can be useful for components or experts developpers for Delphi and valid from 2005 version.
Doing this is easy. For this we need follow the following steps:
- Seleccione una imagen con formato BMP y con tamaño de 24×24 que desea mostrar. El píxel inferior izquierda indica el color transparente.
- Add it to a resource file. If you don’t know how, you can see the previous entry in this blog.
- Once done this, you only need to use the global variable SplashScreenServices and their method AddPluginBitmap into, for example, the Register procedure.
SplashScreenServices is from IOTASplashScreenServices type (Interface Open Tools API SplashScreen Services) defined both (variable and interface) into the ToolsAPI unit, so you need to add it to the uses clause. To avoid compilation errors you need to add the designide bpl into the requires project (designide.dcp).
AddPluginBitmap have some parameters:
- ACaption: text to show on splashscreen. In the exemple “GoogleMaps Library VCL (1.0.1 Final)”.
- ABitmap: handle of the image to show.
- AIsUnRegistered: specifies if it is or not registered. If not (True) will be painted red.
- ALicenseStatus: text to show after the ACaption. In the example “Licence LGPL – Copyright Xavier Martínez – cadetill”.
- ASKUName: will be appended to the caption.
With these simple steps already we have the IDE SplashScreen personalized with our components or experts.
A demo of Register procedure can be:
procedure Register;
{$IFDEF DELPHI2005}
var
  Bmp: HBITMAP;
{$ENDIF}
begin
  // register components and editors
  RegisterPropertyEditor(TypeInfo(TAboutFrm), nil, '', TAboutGMLib);
  RegisterComponentEditor(TGMBase, TGMBaseEditor);
  RegisterComponentEditor(TGMLinkedComponent, TGMLinkedComponentEditor);

  {$IFDEF DELPHI2005}
  ForceDemandLoadState(dlDisable);
  if Assigned(SplashScreenServices) then
  begin
    Bmp := LoadBitmap(FindResourceHInstance(HInstance), 'TGMMap');
    try
      SplashScreenServices.AddPluginBitmap('GoogleMaps Library 1.0.1 Final', Bmp, False, 'Licence LGPL');
    finally
      DeleteObject(Bmp);
    end;
  end;
  {$ENDIF}
end;
I hope you find it useful.
Regards
